Submission Suite Programs
Programs can be added to the Submission Suite setup in order to add LOBs and other selection fields to the Submission Suite for the customer to use. Assignments can be setup here to assign a person and a branch to the Program. More than one Program can be added so that customer selected LOBs can be assigned to specific people and branches.
To Create a Program
- On the Utility menu, click SETUP
- In the Setup Console, navigate to Submission Suite > Programs. The Summary of Programs screen is displayed.
- In the Summary of Programs screen, click [Add New]. The Create New Program screen is displayed.
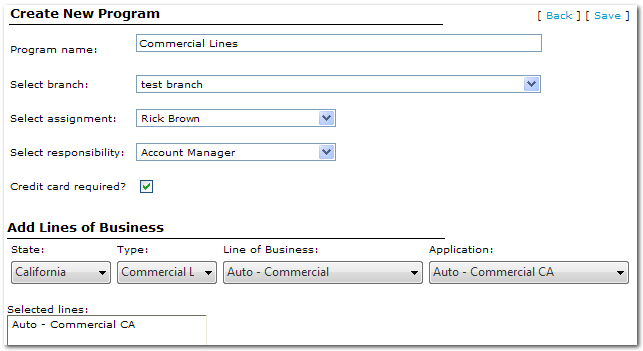
- In the Program name box, enter the name of the Program.
- In the Select branch list, select the branch to which the Program applications will be sent.
- In the Select assignment list, select the name of the person to which the applications will be assigned.
- In the Select responsibility list, select the responsibility title of the person to which the applications will be assigned.
- Select the Credit card required? check box to indicate whether a credit card is necessary to secure a quote. The credit card will not be charged until the customer has agreed on a premium.
- In the Add Lines of Business area, select the following to add one or more lines of business to the Program:
- State: Select the State associated with the LOB.
- Type: Select the Type of lines, either personal or commercial.
- Line of Business: Select the LOB.
- Application: Select the specific application for the LOB. Once this final selection is made, the Selected lines box is populated with the LOB. More may be selected if desired.
- Supplement: Select any supplement forms for the selected LOB. Once the selection is made, the Selected Lines box is populated with the supplement. Additional supplements may be selected by selecting an additional value from the supplement drop down box.
- Selected lines & supplements may also be removed by clicking on the line to remove and clicking the Remove Selected link at the bottom of the screen.
- Once all Program information has been entered, click [Save] at the top of the screen. After [Save] is clicked, the full Program link will be completed. This is the link that can be used to add to a web site so that customers may enter the Submission Suite.
- Notice that the Program Details screen includes several tabs now:
- Details: Details specific to the Program.
- Lines of Business: LOBs and supplements specific to the Program.
- Workflow Steps: Selection of steps customer must complete before getting a quote.
- Marketplace: Placeholder for future enhancements.
- Branding: A color scheme and/or logo specific to the Program can be uploaded.
Tip: The Program logo added here is in addition to the logo that can be added under Color Schemes. Both logos can be present on the Submission Suite site. One specific to the Program and one for the agency. Both logos will be displayed at the Program level.
- Messages: Various messages can be displayed during the application process.
- Attachments: Listing of attachments required for the quote.
- On the Details tab, make the following entries and selections:
- In the Select branch list, select the branch to which the Program applications will be sent.
- In the Select assignment list, select the name of the person to which the applications will be assigned.
- In the Select responsibility list, select the responsibility title of the person to which the applications will be assigned.
- In the Quote number prefix box, enter a prefix for the quote number if necessary to identify the quote and which Program it is associated with.
- In the Quote number suffix box, enter a suffix for the quote number if necessary to identify the quote and which Program it is associated with.
- Select the Is program enabled? check box to identify whether the Program is enabled in the Submission Suite.
Important: Programs can only be enabled when licenses have been purchased.
- Select the Blind copy assignment? check box to have a copy of the submission sent to the person assigned to the program. The assignment must have a valid email address entered on their employee profile in Nexsure.
- Select the Blind copy incomplete submission? check box to have a copy of the incomplete submission sent to the person assigned to the program. An incomplete submission is defined as a submission that has been filled out but the user has not selected the "submit application online" button. The assignment must have a valid email address entered on their employee profile in Nexsure in order to receive the notification.
- Select the Suppress client email? check box to suppress the automated completion confirmation normally sent to the person submitting the request.
- Select the International program? check box to indicate this Program is available for quotes to countries outside of the United States.
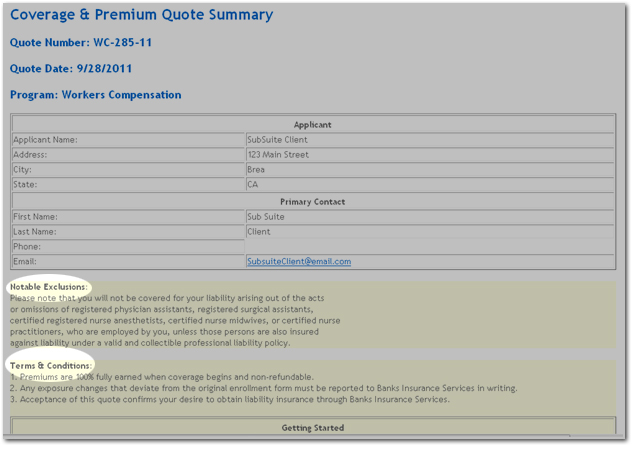
- In the Terms and Conditions box, enter information about the terms and conditions. This information will be
displayed on the Application Review page where the customer accepts and submits the application.
- In the Notable Exclusions box, enter information about exclusions that may apply to the LOBs in the associated Program. This information will be displayed on the Application Review page where the customer accepts and submits the application.
- On the Lines of Business tab, make the following entries and selections for each LOB and supplement that was added to the Program.
- On the Lines of Business tab, a summary is first displayed. The Display Name and Order can be altered by entering the desired text or number and clicking [Save] at the top of the screen.
- Click the Details
 icon next to one of the LOBs in the Program. The application forms and supplements associated with the LOB are displayed. Each form can be Enabled or disabled depending on selections made here. Click [Save] once an application has been Enabled or disabled.
- Click the Details icon next to an application or supplement. The next few steps will determine what Form fields will be displayed for the customer to complete.
- On the Form screen, select form items from the Nexsure Form Layout tree to drag over to the Submission Suite Layout tree. If a new section is needed, enter the name in the Section Settings > New custom section box and click [Add] (or just press the Return key).
Only the lowest level sub-sections can be dragged over to the Submission Suite Layout tree. If a sub-section is no longer needed in the Submission Suite Layout tree, click and drag it back to the Nexsure Form Layout tree.
Tip: A field can be right-clicked to delete or to be moved up and down within the section.
- Once the Submission Suite Layout is complete, the layout items (fields) can be edited so that the field Label can be changed and a Description can be added. When a Description is entered a blue question mark will appear next to that particular field in the Submission Suite. If the customer pauses their pointer on the question mark, the description text will appear in a pop up window. To change the Label or Description click the layout item in the Submission Suite Layout tree. Notice that item is then displayed in the Field Settings area below.
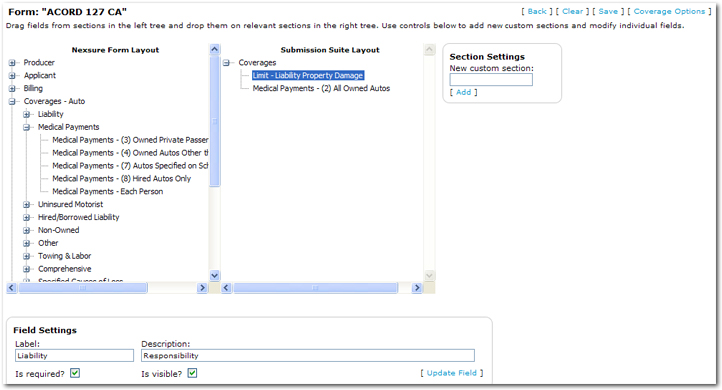
- In the Label box, change the Label of the field if necessary.
- In the Description box, enter a brief description that will be displayed when the customer pauses their pointer over the blue question mark that will appear next to that particular field in the Submission Suite.
- Select the Is required? box if the field must be completed by the customer.
- Select the Is visible? box if the field should be actively displayed in Submission Suite.
- Once entries and selections in the Field Settings area are made, click [Update Field]. The Label in the Submission Suite Layout tree will be updated.
- When finished building the Submission Suite Layout tree and adding Field Settings, click [Save] at the top of the screen. This will save all selections before moving on to the next screen.
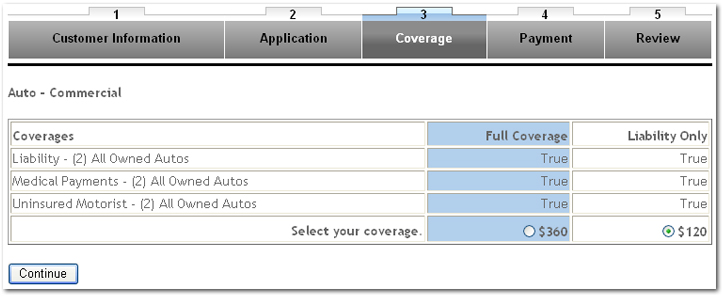
- Click [Coverage Options]. The Coverage Option screen is displayed. This screen is used to build the Coverages matrix that the customer will use to select the coverage they want.

- In the Description box, enter the title for the selectable option. In this case the first one entered is Full Coverage.
- In the Display Order box, enter the numeral to indicate the order in which the options will be displayed. Click [Save Option]. Notice the Coverage Option is moved to the Options Summary table below. The Options will then be displayed to the customer as they are in the Estimated Premiums area; across the top of the matrix.
- Select the check boxes next to each coverage these options will be included in.
- In the Categories Summary area, enter the title for the category in the box and click [Update]. The Category text is then moved under the Category column in the Estimated Premiums table.
- In the Estimated Premiums area, enter the estimated premiums to be displayed to the customer. Click [Save Premiums] once completed.
The Coverage section of Submission Suite will look like the following:
- On the Workflow Steps tab, make the following selections to determine the steps and order of steps the customer will complete.
- Select a step in the Available Steps area and use the arrows to move the step into place in the Selected Steps area.
- The Marketplace tab is currently a placeholder for future enhancements.
- On the Branding tab, make the following selections to add or remove a logo or color scheme specific to the Program.
- In the Program Logo area, click Browse.
Note: Use a logo that is in .gif or .jpg format, that is under 5 kb. The recommended resolution is 100 x 100 pixels.
- Select the desired logo and click [Upload Image]. The logo is added in a preview.
- Custom color schemes for specific programs may also be utilized. By default, the main submission suite color scheme will be used for all programs. Select an existing color or add a new color to have a different color scheme for a specific program.
- On the Messages tab, make the following entries to add messages to the Program site.
- In the Submission Instructions box, enter instructions the customer will see when working on a submission.
- In the Submission Closing Statement box, enter a message that will be displayed to the customer once the submission is closed (whether complete or not.)
- In the Completion Message box, enter a message to the customer that will be displayed upon completion of the submission.
- In the Summary Title box, enter a title for the final summary page displayed to the customer.
- In the Review/Submit check box statement box, enter a message to the customer that will be displayed on the submit and review portal screen above the Back button.
- In the Review/submit hyperlink to extended documentation box, enter a hyperlink that will appear next to the submit application online button in the portal. The hyperlink must be hosted by your company and can bring up a PDF document for the customer to review.
- In theSubmission Confirmation Title box, enter a message to the customer that will be displayed at the top of the completion confirmation message to the customer.
- Click [Save] once all necessary messages have been added.
- On the Attachments tab, make the following entries to require attachments to the Program site.
- In the Description box, enter the name of the attachment that the customer must submit.
- In the Instructions box, enter any information or details regarding the attachment that the customer should be made aware of (i.e "Please use MS Excel spreadsheet".).
- Select the Required? check box to indicate that this attachment is required to secure a quote.
- Once the attachment information has been entered, click [Add]. The attachment request is then added to Submission Suite.
- At the top of the Program Detail screen, click [Save]. The program is saved and the Program link becomes available.
- An existing program may be copied by clicking [Copy]at the top of the program details screen, . The copied program is saved with the words"Copy of" at the beginning of the description field.
Submission Suite General Configuration
Submission Suite Color Scheme
Submission Suite Notification
Submission Suite Credit Card
Submission Suite Utilization